Pages

Friday, November 30, 2012

Embellished flower pocket folders in plastic canvas

Here is the second set of pocket folders that  I have set out to make. I have again made two, one with white plastic canvas, the other with black. I just love how these turn out.
They just look amazing!


Stay tuned! 2 more sets yet to come...eventually.
I have been working on other projects recently. I finished one (which I will post later, as it's a gift for someone and I don't want to spoil the surprise), and I'm almost done with another. I've had to even put those aside temporarily to work on a couple commission pieces (not that I mind, as they bring in money to buy more supplies). I'll post pictures of everything if I can remember to!

Girl Scout logo in Plastic Canvas

While looking through some beaded craft designs online, I found a beaded barrette of the girl scout logo that made me smile. I was a girl scout when I was young, and seeing the  logo brought back some of the memories.
I immediately came up with my own pattern of the logo, and decided to do something with it. I quickly stitched up a couple items using plastic canvas. I had also been wanting to experiment with backing materials for plastic canvas, so this was the perfect opportunity!
On the back of one, I stitched felt to the back of it, just pushing my needle through it when doing the edging. On the back of the other one, I did the same, only using foam. They look OK, but me being the perfectionist that I am, I wasn't thrilled with them.
I didn't know what to do with either of them, but a friend of mine that I work with is active with the girl scouts with her daughter, so I gave them both to her as coasters.


I kept thinking of something else I might be able to do with this logo, and it hit me. I can use it to make a pocket folder like the flower ones that I had made! I got to work right away, and even personalized it (even though the pink yarn I used to personalize it doesn't look quite right).


I am very pleased with the way the folder came out. I think in the future, though, I will use a different color for the name.

Tuesday, September 25, 2012

Commissioned iphone case


I was recently contacted by someone who was interested in a custom designed iphone case. She let me know what she was interested in, and I quickly came up with something.
We went back and forth on the design for a few days until we were able to get exactly what she wanted.
I have never worked with metallic thread before, this was my first experience with it. It was a major pain! I must admit, though, that the end product looks great. The letter in the middle and the purple lines are metallic thread.


She got it in the mail several days ago and she loved it! It always makes me happy when others love what I have made, especially on commission work.

Saturday, August 11, 2012

Double flower pocket folder

I really don't like having to buy patterns to make things. I have been known to download torrents for free patterns, our even make something using a picture as a reference.
When I saw the pictures for plastic canvas whimsical pocket folders, I knew I just had to make them. I couldn't get a picture good enough to use, and I couldn't find a free download for it (yes, I am ashamed to say that I did try). I ended up buying the patterns because I love them so much.
When I began, I couldn't decide whether or not to make a set of black or white folders, so I chose to make both! Here are the results of the first folder. The other 3 are yet to come!


Friday, July 13, 2012

KC Chiefs Tissue Box cover

My best friend's birthday was recently, and I wanted to make him something that he would love. I wanted it to be something that nobody else would give him, so I immediately started looking for ideas. He is a big Florida State and Kansas City Chiefs fan, so I was looking for something along those lines.
I was sitting at work, and I glanced over at my Mario tissue box cover, so that got me thinking. I dug through my yarn stash to make sure I had the right colors (I did!), so now all I needed was a good idea/pattern.
I found one that was perfect for him and made this:


Friday, June 29, 2012

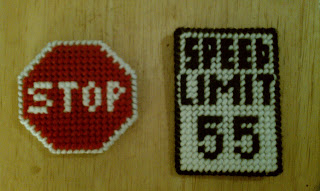
Road sign magnet set

I came across the pattern for these in a book that I had borrowed from my mom. I love them, and I just had to make them.
I actually found it pretty easy to make 2 sets at once rather than one at a time. Here are the pictures:


Tuesday, June 19, 2012

Plastic Canvas OKC Thunder magnets

I was browsing through Etsy, when I discovered the awesome sports team/logo patterns of AuntCCcreations. They are awesome!
Living in OKC and since the Thunder are in the Finals, I immediately looked to see if I could find a pattern for anything Thunder related. Unfortunately, she didn't have anything. I decided to send her a quick message to see if she could possibly come up with something. The shop owner was very nice and came up with a design for me quickly. I bought it right away. The patterns are awesome!


As soon as I received them from her, I got started making a batch of the magnets. They went pretty quickly, and once completed, they look even better in person. I made several, and I'm in the middle of making several more. I took them to work and am trying to sell them to my coworkers.  
Here is a picture of the first batch, right after I attached the magnets to the back. 


My current batch of magnets.


Update: I now have some in my Etsy shop. Feel free to stop by and buy some!

Friday, June 8, 2012

Pansy tissue box cover

I finished another "at work" project. It is a pansy tissue box cover.
The pattern I have for it is actually for a tissue box cover and jewelry box set, but I just wanted to make the one thing to start with, then make the other if I liked it. I love how it turned out, it looks really great. The colors really pop against the black background.


This was my first time working with 10-mesh plastic canvas. I can't say that I'm a big fan. It was a pain to cut since the squares are so small. Then, I used 6 strands of embroidery floss, which goes through the skein of floss pretty quickly. I don't think I'll be making the matching jewelry box to go with this. Making those flowers was too much of a pain. I do have some other projects in mind to use with the 10-mesh, so hopefully I have a better experience.


 I am taking a small break from working on my Disney project. My best friend's birthday is coming up, and I have plans to make some things for him. I'm going to get them done first. They should be quick, though. I'll post them when I have them completed.

Tuesday, June 5, 2012

Disney Dreams: Lion King - week 8

Here is this week's update. The lighting wasn't great for this picture, but the flash managed to catch on the pearl filament, so you can see a little sparkle in the sky!


Sunday, May 27, 2012

Disney Dreams: The Lion King - week 7

This week was slower going than usual. I started adding some yellow, and one of the shades of yellow is tweeded with the pearl filament. It makes the sunshine sparkly and it looks really good, but that pearl filament is a pain in the butt to work with! Don't get me wrong, the end result is totally worth it to have the added sparkle, but when I use it, I tend to work slower since it likes to snag and it always feels like it is about to snap.

Here is my progress picture. You can't really see the sparkle very well in this photo, but I'm sure it'll show up eventually in one of my progress shots.


Sunday, May 20, 2012

Disney Dreams: Lion King - Week 6

Here is my progress on my Lion King cross stitch. I have the close-up shot, and this time I am also including a picture further out to better convey the actual size of this thing. I was showing pictures to a friend of mine, and he wanted to see how big this thing will get.
I have it in a frame, so the entire width isn't shown, but you can get an idea from the height.


Saturday, May 19, 2012

Custom Kirby

I haven't been working on my Disney project for the past week. I had a custom order for one of the iphone cases that I make, so I had to finish that first. I did manage to take a picture of it before I sent it off to its new home.
With an actual phone in the case, the holes won't be so noticeable.


This was my first custom order request, so I'm pretty excited, and I like how it turned out.

Wednesday, May 16, 2012

Hidden secrets in the Lion King painting

Must keep motivated! One of the things that I have done to keep myself motivated on working on the Lion King, is I have the painting that my kit is based off of as the wallpaper on my work computer.
One day while looking at all the detail in the painting, I noticed something that is very easy to miss, and something that most likely the painter thought would be fun. In the bottom right corner area of the Lion King painting, there is an elephant with some birds perched on his tusks. The birds are in the cross stitch, no problem. But right next to the bird on the far right is something that isn't in the cross stitch (probably because the detail is too small to be able to do it). There is a very tiny Jiminy Cricket. I had to do a double take and stare for a moment the first time I noticed it, but it is surely there.
If you have a chance to find a large image of the painting, you should check it out! It is really neat.

Finished the car

I finished my Car, below are the pictures.
I started working on a tissue box cover, but I will have to set it aside for a short bit. In the course of a couple days, I actually got 2 commissions, so I will be working on those first. One of them will even take precedence over my Disney piece. No worries, though, since it shouldn't take me very long to complete it. This weekend I'll post pictures of my Disney progress as well.


Tuesday, May 8, 2012

Classic Car Keeper

Things have been crazy around my house over the weekend, so I haven't had time to take any pictures of my progress on the Disney Dreams project. Plus, I don't work on it every day, so I don't get much done every week. Next weekend I am going to be out of town for a wedding in the family, so I don't know if I'll be able to post then, either. I will try, though! If not, then the week after that I'll put up a post with 3 weeks of progress.

In the mean time, I'll post pictures of my other project.
I don't want to keep taking my Disney piece back and forth to work (that's just asking for an accident to happen), so I have separate projects for work and home. My work project is a plastic canvas car. I was browsing through the patterns on freepatterns.com, and found the pattern for the Classic Car Keeper. I fell in love with it.
Here are pictures of my pieces and progress so far. I decided to make the car a dark gray color rather than the hunter green that the pattern calls for (mostly because i already had the gray yarn). Also, I used brown plastic instead of the tan that the pattern called for (because Hobby Lobby didn't have any tan).
When I first started putting things together, it looked more like a boat than a car. In a way, it still does.


My only problem that I am running into with this car is that there are two pieces (one for each side) that I am trying to figure out how they attach to the whole thing. They are the front fender supports. The pattern tells where to attach it, but I don't know what direction and way the part faces. I skipped that part for now and will put everything else together and see if that helps narrow things down. If anybody knows how this attaches, please let me know!

Sunday, April 29, 2012

Disney Dreams: The Lion King - Week 3

I was so happy to finally get to work with another color other than a shade of purple! Right now I'm using a peach/gray blend with yellow coming up next. This project is mostly sky, so I guess I should get used to the purples and get used to working on sky. It gets boring, though. I'll eventually get there, I just need to keep focused and posting my weekly updates, even if I don't get a lot done the week prior.
We can do this!


Sunday, April 22, 2012

Disney Dreams: Lion King - 2 weeks

I'm slow! At least I feel slow. Plus, I don't work on it every night, so this is actually only a few days worth of work on it. I'm going to try to post an update every week so everyone can see how far I'm getting (plus it will keep me motivated to keep working on it).
Here we are so far!


Saturday, April 14, 2012

Disney Dreams: The Lion King - One week down

After being discouraged from working on this due to the thread issues, I haven't worked much on this project this week. I have since received the correct thread needed, so I am good to go.
I also have had a soreness in my right arm (probably from too much crafting!). 
Here is my progress so far:

Sunday, April 8, 2012

Disney Dreams: The Lion King

Perusing the forum of my favorite craft website, www.spritestitch.com, I came across a thread that follows the progress of a fellow member making the Disney Dreams: Beauty and the Beast cross stitch kit.
I have always loved these and have wanted to make one myself, so I started looking online at which ones are available. As I was looking at the newest one (The Lion King) my fiance looked over and said, "That's really cool! If I buy you the kit, will you make that one?"
Immediately I said Yes! It was perfect! I get to make one of the Disney Collection, and I don't even have to pay for it!
Here is what it will look like once it is completed:


We were at the hobby store last weekend, and they happened to have it available, so we scooped it up and bought it right away. I got home and got started on it.


I would be a little farther along, but as I started to get another color ready, I noticed something odd. The dark purple was light and the light purple was dark. I immediately went through all my thread to make sure that I had all that I should quantity-wise, and it looked OK except for this one mixup between the 2 colors. Due to this error, I am going to end up being short on one of the colors (since I ended up with 18 strands of something I only need 8 for, and 4 strands that I need 18 of).
I have already emailed the company to see if they can verify that this issue is only that the 2 colors were switched, and if they can send me the strands that I will end up being short. I'm going to keep posting my progress on this blog and on spritestitch, so feel free to come back and follow along with my progress!

P.S. I am horrible with sticking with one project all the way through to the end. I will need major encouragement to keep going!


Update!
I received word back from the company about the thread issue that I was having. They agreed that most likely the 2 colors just got switched, however in order to make sure that both colors are correct, they are going to be sending me both colors. Yay! I've been so hesitant to work on this lately, that I've been avoiding it. Now I can continue! I even worked a little on it last night. My problem is that I'm not very fast. Oh well!

Wednesday, April 4, 2012

Texas Rangers cross stitch iphone case.

This is a little something that I made as a Thank You gift for a friend of mine. I didn't take any in-progress pictures of it, mainly because it went so fast. This one took very little time to make.
The person I made this for is a big Texas Rangers fan, and since she also happens to have an iphone, I thought this would be a perfect gift.
She loved it!

Sunday, March 18, 2012

Bowser iphone case

Not much description for this one. This is the first one that I have done that I created the pattern myself, though. I like how it turned out, even if it was a bit of a pain to make.

Tuesday, March 13, 2012

Power On cross stitch iphone case

I have been really getting into making these cross-stitch iphone cases lately. This time I used a black case and made a big power button. This is actually one of the patterns that came with the cases; it's the only one that was included that I liked.

This was went even quicker than the Kirby case. I could have finished this one in one night (I took 2 nights, though).  Enjoy!

Sunday, March 11, 2012

Kirby Cross-stitch iphone 4 case/cover

After finishing the piranha plant iphone cover, I started looking for something else to make for an iphone cover. I had a couple green cases, and I was wondering what I could possibly make that would look OK with this color background.
I remembered that a fellow Sprite Stitcher had made a Kirby tissue box cover that had some green background (although it was a different shade of green altogether), but that got me thinking of Kirby. The internet search began!
I easily found the Kirby sprites to use for the pattern. After trying to decide which Kirby to use, I ran across an the image I ultimately used. I loved it, so I had to use it for my next project.


Thursday, March 8, 2012

Piranha plant Cross-stitch iphone 4 case/cover

I was browsing projects other people had made. I totally stole this idea that I found and just had to make my own. The funny thing is, I don't even own an iphone!

I searched several places online to find a good quality case to cross stitch on. I actually came across 2 different kinds. There is one made of silicone (that seems flimsy and easy to distort if your stitches are too tight) and one made of (I guess) plastic. I chose to go with the more sturdy plastic rather than trying out the silicone, I decided I didn't want the hassle of worrying about how tight the stitches are.

I searched online for a cost-effective place to purchase some of these cases. It took some searching, but I did find a website that allowed me to buy some pretty cheap (minimum order of 10) and I got to choose the colors I wanted (for the most part, based on what they had available at the time). I impatiently waited and waited for the cases to arrive in the mail. It took a while since they were coming from China, but for the price I paid, I cannot complain at all!

Finally they arrived! The cases came with a needle and 3 colors of thread each. I went through each case to see the array of colors I had to work with. Of course, all but 2 packages had the same 3 colors: purple, yellow, black. I have no idea what I could even make with just those colors. The other 2 cases came with: red, yellow, black. Not much difference, really. I pulled out 2 black, 1 red, and the rest of the colors I needed I either already had or went to buy. I was all ready to begin!


Having gotten this far, I noticed right away that the thread included with the cases were not that great to work with. They were free, though, so I still used them when I could, but given the option I would prefer using normal thread.


I took pictures of my progress periodically. That is something that I really enjoy seeing when looking at others' work, so I try including it in mine. I sometimes forget, though, for long periods of time.


Finally, I finished it! I just couldn't wait and had to post all my pictures and everything right away. Enjoy!